Thursday, December 8, 2011

Vanilla Bean Cupcakes

My friend Aoife decided to have a games night so naturally I volunteered to bring "game night" themed cupcakes (Any excuse to bake right?!). Naturally my first thought was fondant but instead I went for something even easier.

Here's what you need....


Mini marshmallows + black edible marker = dice cupcake toppers!! Simple!

I made vanilla and chocolate cupcakes with vanilla and chocolate cream cheese frosting...yum!
I must also give a mention to a recipe I found for "The Ultimate Vanilla Cupcake",I loved this recipe,it really is worth a go but I must warn you it is more expensive than usual.It uses vanilla pods which cost me €6 for two!!! So maybe just for special occasions :)

The Ultimate Vanilla Cupcake Recipe

Yield: 16 cupcakes
  • 1 cup (225 grams) granulated sugar
  • 1 vanilla bean
  • 1 3/4 cups (175 grams) cake flour, not self-rising
  • 1 1/2 teaspoons baking powder
  • 1/2 teaspoon baking soda
  • 1/2 teaspoon salt
  • 1/4 cup (57 grams) unsalted butter, room temperature
  • 2 large eggs, room temperature
  • 1/3 cup (75 grams) full-fat sour cream
  • 1/4 cup canola oil or vegetable oil (60 ml)
  • 1 tablespoon pure (not imitation) vanilla extract
  • 2/3 cup (160 ml) whole milk
  1. Preheat oven to 350 F (175 C).
  2. In a small bowl, combine sugar and seeds from the vanilla bean. (For those of you who are new to using vanilla beans, check out this video to learn how to get the seeds out of the bean.)
  3. Using the back of a spoon, move around the bowl and apply pressure to break up any clumps of seeds and to better infuse the vanilla flavor into the sugar. Set aside.
  4. In a medium-sized mixing bowl or bowl of a stand mixer, mix together cake flour, baking powder, baking soda, and salt.
  5. Add the vanilla bean sugar and mix until well combined.
  6. Add butter and mix on medium-low speed for three minutes.  Because there is so little butter, you'll end up with a very fine crumb texture.
  7. In a small mixing bowl, whisk together eggs, sour cream, oil, and vanilla extract until smooth.
  8. Add the egg mixture to the flour mixture and beat on medium speed until just combined.
  9. Slowly add milk and mix on low speed until just combined.  The batter will be liquid.  (Don't worry, you didn't do anything wrong.  It's supposed to be that way.)
  10. Fill cupcake liners just over 1/2 full.
  11. Bake for 14 minutes and then test to see if they are done. They are done when a toothpick comes out without wet batter stuck to it.  The cupcakes should appear white with specks of vanilla bean. They should not turn a golden brown.  If they are not done, test again in two minutes.  If they are still not done, test again in another two minutes.
  12. When the cupcakes are done, remove them immediately from the tins and leave them on a cooling rack (or just on your counter if you don't own a cooling rack) to cool.
Recipe from "cupcake Project"

Happy Baking!

Shirley

Monday, October 10, 2011

My "C'mon Ireland" cupcakes!

I made these to cheer on our boys in green in the Rugby World Cup,the match was on at 6 a.m so I was thinking they probably would have been eaten for lunch instead of breakfast,how wrong I was! They were gone by 7 a.m!


These are sooo simple to make!

  • Make your usual cupcake batter.
  • Split the batter in two and add (in this case)orange food colouring.
  • Put your orange batter in your cupcake cases first,then followed by your plain batter.
  • Cook!
  • Whip up some buttercream,add a dash of green food colouring and pipe over your cooled cupcakes.
  • Et voila! The Irish tri-coloured flag cupcakes!

Happy Baking!

Shirley

Tuesday, September 27, 2011

Something I baked earlier.........

Here's a few cakes I've done the last few months!


This is the first ever cake I did with fondant. It was for my sisters baby shower :) The cakes were chocolate fudge for the head and lemon sponge for the body. Don't ya just love those toes?!


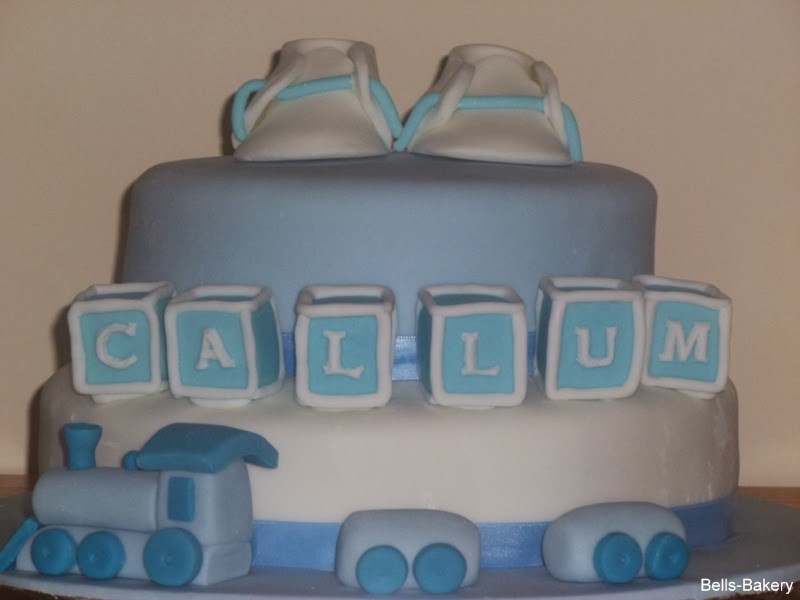
This was my nephew Callums christening cake. It was my first two tiered cake and I was so nervous but it was a doddle. My sister was delighted with it so I was a happy baker.


A little choooo-chooooo! This is actually simple enough to make and it really is the cutest thing!


I didn't use a template for the booties,its pretty easy to figure out after a few attempts,you just need a little patience! The blocks require a hell of a lot of patience but as a first timer I was suuuuper happy with them.


This cake was for a friend who has a slight obsession with her dogs. Can't you tell?! Lol.
The cake was a Chocolate Biscuit Cake.


Happy Baking!

Shirley x

The blogging begins!

Hey!

So this is my first post,I am so excited to be starting this blog,not only will it give me a purpose to my baking but it also lets me unleash my excitement for baking and everything that comes with it!

So I first started baking about 2yrs ago when I got a present of a baking book off my sister,Jacqueline,and so the addiction began. Earlier this year,Jacq and I threw our younger sister,Aishling, a baby shower and this is when I entered the world of sugarcraft.........Obsessed!! I love, love,love sugarcraft! It makes every cake so unique for every occassion and its soo much fun! I do not claim to be the best baker out there,I just love doing it (as much as my family and boyfriend give out to me about their waistlines)!

Soooo here we go :)

Happy Baking!

Shirley