Thursday, January 30, 2014

American Style Soft Baked White Chocolate Chip Cookies


My love of cookies has been car-eh-zeeee lately! I'm blaming the sheer simplicity and speed at which I can whip this cookie dough up. I call these cookies 'American style' because its not often you can get these soft baked cookies this side of the pond but they are fast becoming my fave cookies. The chewy centre and they way they melt in your mouth with a cuppa is beyond scrumptious.


This cookie dough is so versatile. It is the exact same cookie dough as my Chocolate Chip Cookies but with white chocolate chips. It is like a whole different cookie. It was sweet,creamy, crumbly on the outside, chewy in the inside. And the greatest thing about these is I baked some straight from freezer. So you always have homemade cookies on hand!


Recipe for Soft Baked Chocolate Chip Cookies


Makes 30

Ingredients

  • 170g butter
  • 150g demerara sugar
  • 50g caster sugar
  • 1 egg
  • 1 1/2 tsp vanilla extract
  • 250g plain flour
  • 2 tsp cornflour
  • 1 tsp bicarbonate of soda
  • 200g White chocolate chips


Instructions


  1. In a large bowl, beat your butter for 1 or 2 minutes to soften the butter. Add both sugars and beat until the mixture is light and fluffy. The demerara is quite a large grain so do not be alarmed if this does not cream to a smooth texture. Add your egg and vanilla extract and beat.
  2. In a separate bowl, sift your flour, cornflour and bicarbonate of soda together. Add to wet ingredients and mix. Add your chocolate chip and mix slowly for a 30 seconds until evenly dispersed.
  3. Wrap dough in cling film and put in freezer for 1 hour. These bake great from frozen.You can alternatively chill it in the fridge for 2-3 hours. But YOU MUST chill your dough. The key to a good cookie is to keep the dough chilled. Ever wondered why you put lovely round balls in the oven and they come out a crispy thin cookie? Well the taller and more chilled you have your dough the less "melting" time it has.
  4. Pre-heat oven to 180°C (fan assisted). Roll a ball (tbsp approx) of your dough and place on baking sheet. Leaving space for each cookie to spread. Then pinch them with your fingers into a more triangular shape. This will make the cookies chunkier. Bake for 8-10 minutes. Cool on baking sheet for 5 minutes before moving to wired rack.

Hope everyone is having a great Thursday! I have a quiet a few cakes to do in the next few days so I'll see you all Tuesday with my weekend bakes :)

Shirley x

Tuesday, January 28, 2014

A recipe-less Lemon Poppy Seed Loaf


Today I come to you fine folk as one annoyed blogger.....

A few days ago I had a half day from work. I came home and decided to make something nice for after the dinner. I was on the verge of making my Madeira Cake when I realised I only had one egg. So it was either go out in the torrential rain for two eggs or get inventive with what I had.

And man, oh man am I happy I was super lazy that day because this is one of THE nicest cakes I have ever tasted. And that dear friends says A LOT!

The reason for the one measly photo is this is all I could squabble away from my family. I was losing daylight and there was no way I was going to be able to keep this in its perfect loaf state to photograph in the morning. How I wish you could all see how drool-worthy it looked. It had a rich brown colour and was smothered in a thin lemon glaze.

As you all probably know now from here, here and here. I have a slight love (slash full blown obsession) with poppy seeds. And lemons and poppy seeds are, well, a match made in heaven! I was completely expecting this cake to go wrong. Either taste like complete and utter cardboard or to bubble over in the oven...just something had to! But no. It was crumbly,moist,lemony and almost melted in your mouth. My Dad who is probably my biggest critic said it was the nicest cake he had tasted in a long while.

Ughh here's the kicker...

I never wrote my recipe down!! (I am annoyed with myself to even type that)

I have an idea what it was, well I know it had one egg anyway ha :) I just hope I can get it bang on perfect again and come back to you all with the recipe.

So stay tuned.......and all you fellow lemon and poppy seed lovers say a lil' prayer ha :)

Shirley x

Thursday, January 23, 2014

White Chocolate Rice Krispie Treats


I LOOOOOVE white chocolate, always have done. It's just creamy, sweet and delicious......everything that makes me happy!

Mixing chocolate with rice krispies is something we do regularly here in our house. When we were younger, we had to leave them set and become a rice krispie bun. I can't remember the last time we actually let them set. My sister and I literally eat it out of the bowl, chocolate still warm with the crunch of the krispies.........Sometimes it really is the simple things!

This recipe is not exactly ground breaking nor is it rocket science. This is actually what makes it so great. Plus they are great to make with kids. My nephew is two so he loved to play 'helpuh' with me.


Recipe for White Chocolate RKT


Ingredients


  • 100g butter
  • 400g marshmallows
  • 300g rice krispies approx
  • 100g white chocolate......not chocolate chips.

Instructions

  1. In large saucepan over low heat, melt your butter. Add marshmallows and stir until melted and well mixed. Keep stirring for about 2 minutes and then remove from the heat.
  2. Add your rice krispies (if you feel the need to add more or less, do so!). Stir until well combined.
  3. Using the back of a spoon, press the mixture firmly into a buttered 8x12in tin. Cut into desired sized squares when cooled.

I do make mine quite chunky so do feel free to half the quantities for a smaller tin. I have and it works out perfectly.

Hope you are all having a great day :)

Shirley x

Tuesday, January 21, 2014

Soft Baked Chocolate Chip Cookies


The cough continues friends and so does the easy peasy comforting recipes. I love to bake on Saturday mornings or at least have some freshly baked goods for Saturday morning but this weekend with the cough and lack of sleep. I needed something quick and easy. Something that was going to get rid of my sweet tooth but still be delicious and could be washed down with a cuppa!


These cookies are way too easy. There is no real 'work' involved. They are more of an American style cookie as they are soft baked. Firm and crumbly on the outside but soft and chewy in the centre. I'm really beginning to love this style. AND they bake in 10 minutes! No waiting around 'Watching the oven' (as I've been known to do on numerous occasions). This dough also freezes perfectly.

Feeling Peckish? Out comes the cookie dough, roll up a few dough balls on a baking sheet, into the oven. Ten minutes later you have freshly baked homemade cookies...*happy dance*

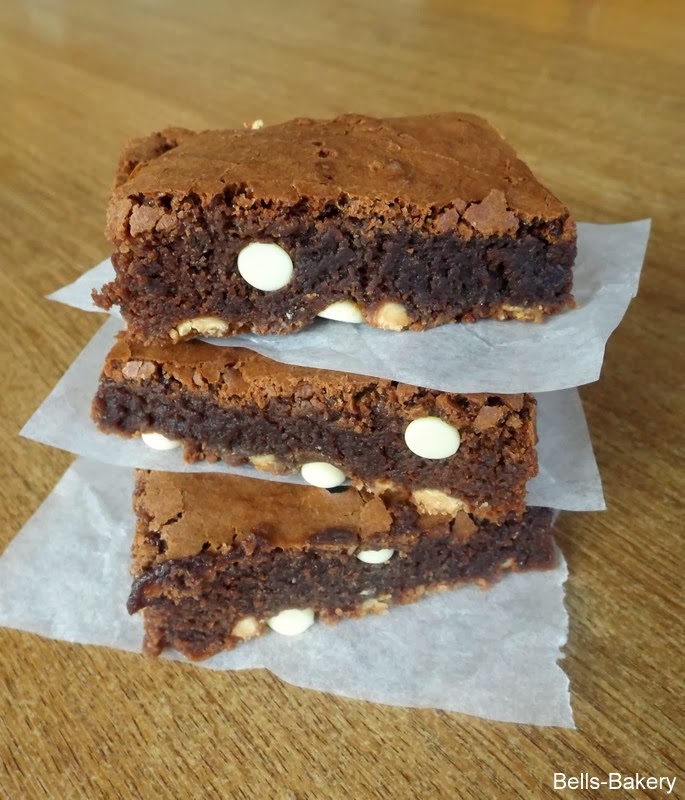
I've played around with A LOT of cookie recipes but these are the best. It will definitely be my go-to recipe from now on, just for the sheer simplicity of it. Most cookie recipes go for light brown sugar but I used demerara in these. It is like a whole different cookie. It does make the batter grainy but it adds a whole new dimension of flavour. I recently used this sugar in my white chocolate chip brownies and looking back they were by far the nicest brownies I've made. My sister has begged me to make them again and again. 


Recipe for Soft Baked Chocolate Chip Cookies


Makes 30

Ingredients

  • 170g butter
  • 150g demerara sugar
  • 50g caster sugar
  • 1 egg
  • 1 1/2 tsp vanilla extract
  • 250g plain flour
  • 2 tsp cornflour
  • 1 tsp bicarbonate of soda
  • 230g chocolate chips


Instructions


  1. In a large bowl, beat your butter for 1 or 2 minutes to soften the butter. Add both sugars and beat until the mixture is light and fluffy. The demerara is quite a large grain so do not be alarmed if this does not cream to a smooth texture. Add your egg and vanilla extract and beat.
  2. In a separate bowl, sift your flour, cornflour and bicarbonate of soda together. Add to wet ingredients and mix. Add your chocolate chip and mix slowly for a 30 seconds until evenly dispersed.
  3. Wrap dough in cling film and put in freezer for 1 hour. You can alternatively chill it in the fridge for 2-3 hours. But YOU MUST chill your dough. The key to a good cookie is to keep the dough chilled. Ever wondered why you put lovely round balls in the oven and they come out a crispy thin cookie? Well the taller and more chilled you have your dough the less "melting" time it has.
  4. Pre-heat oven to 180°C (fan assisted). Roll a ball (tbsp approx) of your dough and place on baking sheet. Leaving space for each cookie to spread. Then pinch them with your fingers into a more triangular shape. This will make the cookies chunkier. Bake for 8-10 minutes. Cool on baking sheet for 5 minutes before moving to wired rack.

Enjoy!

Hope everyone is having a great day.

Shirley x

Thursday, January 16, 2014

White Chocolate Chip Brownies


I have a cough and I want the whole world to stop and mind me.

Unfortunately that's not reality lol! A few nights ago on an evening stroll with my sister, we got caught in some fog which has now resulted in the most irritating cough EVER. It's more of a ticklish cough that no matter how many times you cough, it's still there. For the past few nights I have been sleeping sitting up which means no sleep really. So last night I was tired and cranky and wanted something comforting......obviously cake was the answer.

I was in no mood for pulling out cake tins and start the cake process (Me?!....I must have been really feeling sorry for myself), I wanted something quick,comforting and moreish! Brownies were the answer :)


It's been quite awhile since I've had brownies and I honestly don't know why I don't whip them up more often. They're moist,warm and cakey. I'm just lucky there wasn't ice-cream in the freezer because I would have demolished the lot in my feeling-sorry-for-myself state. Adding the White chocolate chips gave them little dots of sweet creaminess here and there, they were exactly what I needed. Yaaay for Brownies :)


Recipe for White Chocolate Brownies


Ingredients


  • 175g good-quality dark chocolate (70-80% cocoa solids)
  • 175g butter,cubed
  • 25g good-quality cocoa powder,sifted
  • 3 eggs
  • 125g caster sugar
  • 100g demerara sugar} alternatively use 225g light brown sugar instead of caster and demerara sugar
  • 1 tsp vanilla extract
  • 100g plain flour
  • 100g white chocolate chips

20 x 20cm (8 x 8in) square tin


Instructions

  1. Preheat the oven to 160°C (fan-assisted oven). Line the base and sides of the tin with parchment paper. 
  2. Melt the chocolate, butter and cocoa powder together in a heatproof bowl set over a saucepan of simmering water. Do not let the base of the bowl touch the water. Remove from the heat.
  3. In a separate large bowl, whisk the eggs, both sugars and vanilla extract for 2-3 minutes on high speed until the mixture looks thicker almost whipped like. Continuing to whisk, add the chocolate mixture until well combined. Sift in the flour and add your chocolate chips. Fold through with a spatula. 
  4. Spoon the mixture into the prepared tin and bake in the oven for 30-35 minutes. When cooked, it should be dry on top but still slightly 'gooey' inside. Don't be tempted to leave it in the oven any longer than this or you will have cake and not brownies. Allow to cool in the tin, then cut into squares or any shape you desire.

These cheered me up no end last night. Sometimes you just need cake!

Hope everyone is having a great Thursday :)

Shirley x

Tuesday, January 14, 2014

Pecan Cinnamon Rolls


I'm trying to be healthier this year and Monday to Friday I'm pretty good but when Friday evening comes my sweet tooth kicks in.....big time!

Last Friday night literally about 10 o'clock at night, I got a massive craving for Cinnamon Rolls. These aren't something you can just whip up. These take a bit of patience. There's making the dough,proofing the dough and then re-proofing, it was ridiculous when I think about it. I literally sat on the kitchen floor at about 1 a.m and watched them bake. And they were sooooo worth it.

But they were worth it even more the next morning for breakfast!


I cannot for love nor diamonds remember who told me to add pecans to Cinnamon Rolls but if I could I would give them a big fat hug. Such a great combination! I made a slightly easier glaze than the usual recipe as time was not on my side. It was quite runny but still had the sweet sticky-ness you would expect from a Cinnamon Roll.

I find these guys beyond filling, I ate about half of it before I gave up (Nothing to do with the fact I had eaten two a few hours earlier!!) They are addictive, even though you are stuffed, after a few minutes you will find yourself over picking at it again.


Recipe for Pecan Cinnamon Rolls


Makes 12-15

Ingredients


Dough

  • 7g packet fast-action yeast
  • 125ml warm water
  • 125ml scalded milk
  • 60g sugar
  • 75g butter,melted
  • 1tsp salt
  • 1 egg
  • 520g plain flour

Filling

  • 115g melted butter,plus extra for pan
  • 250g sugar,plus extra for pan
  • 2 tbsp ground cinnamon
  • 150g of finely chopped pecans

Glaze

  •  200g icing sugar
  • 1 tsp vanilla extract
  • 3 to 5 tbsp hot water

Instructions

  1. In a small bowl or jug ,dissolve yeast in water and set aside until frothy and bubbly. This wont take long, a few minutes perhaps.Heat your milk. Melt your butter.
  2. In a large bowl, mix milk,sugar and melted butter, salt and egg. Add flour and mix until mixture is smooth like. Add yeast mixture and mix, if it seems too wet add a some flour little by little. Using a dough hook, knead until dough is smooth and almost elasticky. This usually takes about 5 minutes using a mixer. Place into a well greased bowl, cover with clingfilm and let rise until double in size, 1 - 1 1/2hrs approx.
  3. When doubled in size,punch dough down. Roll out on a floured surface into a 15x9 inch rectangle. Mix sugar and cinnamon. Spread melted butter over dough (leaving a drop for the pan) and sprinkle sugar/cinnamon mixture over it (again leaving a bit for the pan). Sprinkle over your pecans. Beginning at the larger side (15inch) roll up dough and pinch edges together to seal. Cut into slices, I always aim for a 1 inch cut, hence the 12-15 serving.
  4. Coat bottom of baking pan with melted butter and sprinkle remaining sugar/cinnamon mixture. Place cinnamon roll slices close together in the pan. Let dough rise until doubled again, usually takes 45mins approx.Pre-heat oven to 170°C (fan-assisted).
  5. Bake for 20 mins or until nicely browned.
  6. Mix icing sugar and vanilla. Add 1tbsp of hot water at a time until the glaze reaches desired consistency. This is quite a runny glaze.


I knew a love affair had been born when I first tasted these all those months ago. So filling and indulgent, they are perfect for weekend brunch or those lazy Sundays. I'm still such a huge fan!


Hope everyone is having a great day!

Shirley x


Thursday, January 9, 2014

Poppy Seed Bread Rolls


I really don't know if bread gets any better than this. As you know by now I am a carbaholic. I sometimes wish bread was never invented. But then I would never have got to eaten poppy seed bread....I AAAADORE this bread. I could eat buckets of it. It truly is my all time favourite bread. Trust me when I say homemade is waaay nicer, it honestly has no comparison to store bought. This, friends, is the real deal!


I actually really love baking bread. The only set back is it never lasts in my house.....ever. It's gone within a few hours and if you weren't an early bird. Tough! You have missed out! Seriously,I can't tell you how many times my sister (Hi Jacq!) has called over after seeing a post only to hear "Ahhh sorry they're gone". We are bread people.


This is a basic white bread recipe and I chose to make large bap sized rolls. I got about 4 out of this recipe but they were quite large/huge! Realistically I should have halved them to get 8 good sized rolls. It also makes a pretty good sized 2lb loaf. I was super generous with the poppy seeds because, you know, I love them! But these could be topped with pretty much any and every seed (Let the experimenting begin). I always use a mixer when baking bread as I haven't mastered the art of kneading just yet. I can never get it smooth enough which leads to really dense bread from over kneading. Sigh!


Recipe for Poppy Seed Bread Rolls


Makes 8 good sized rolls


Ingredients

  • 7g sachet fast action dried yeast
  • 300ml lukewarm water
  • 1tsp sugar
  • 450g strong white flour
  • 1tsp salt

Instructions


  1. Pour your water into a jug, add your fast action dried yeast and sugar. Leave stand for 1 min. This is not really necessary with fast action yeast but I always do it. You will see the mixture starting to bubble and froth ever so slightly......don't freak out. This means its working.
  2. In a large bowl add your flour and salt.
  3. Pour your yeast mixture into your flour and salt.
  4. Gradually mix the mixture together (using a dough hook if using a machine) to a soft dough. Add a drop of olive oil little by little if you feel it is not coming together.
  5. Knead the dough until it is smooth and elastic. This takes about 5 mins on a low speed. If you're not sure, stop the machine and have a look. It should look smooth and have no cracks and lumps. Remove from bowl and place into a clean,well oiled bowl. Set it in a warm place for 1 1/2hrs until it has doubled in size.
  6. When risen, knock back the dough (basically punch the dough two or three times).Remove from bowl. You should see strands of the dough trying to cling to side of the bowl, this is a good sign. It means the yeast has done its job with the flour and helped form these gluten strands. This is what makes bread light and airy. Divide your rolls into eight and place on tray. Cover with oiled cling film and leave to rise in a warm place for 30 mins or again doubled in size.
  7. Pre-heat oven to 200°C (fan-assisted oven). Brush with water and sprinkle with poppy seeds. Bake for 15-20 mins or until golden brown. If unsure tap the rolls underneath, they should sound hollow.


You can then indulge in a bite of carby heaven. FYI these are sensational toasted and smeared with butter!

Enjoy!

Shirley x

Tuesday, January 7, 2014

Lemon and Ginger Detox Drink


Happy New Year folks!

I've decided to start off the new year here on bells-bakery with something, as you can tell, slightly different. A detox drink! With the indulgence of Christmas over, I think about 99% of the population are on a health kick and I am no different!

My Grandmother used to drink a cup of cooled boiled water nearly every morning and there was not a wrinkle on her face, so a few months back I decided to take the challenge. My skin changed practically overnight...Yay :)

I am well aware of the power of detoxes and such but at this time of year, when the weather is still cold and dreary, a warm detox drink is just what you need. Not only is it bursting with health benefits, it tastes pretty good. It is light, refreshing and the ginger gives it a real warmth. I've tried it with some honey too, it gives a lovely warm sweetness. You can also drink this cooled.


Recipe for Lemon and Ginger Detox Drink


Ingredients


  • hot water
  • knob of ginger
  • lemon


Instructions

  1. Pour your cup of hot water. Peel and grate your ginger. Add to hot water. All these little bits float down to the bottom of the cup but you will still get all the ginger taste and warmth.
  2. Cut and squeeze about a third of a lemon into your water and you're done!


It could not be any easier! It is by far my fav detox drink, it is soooo quick and easy. As much as I love juices and smoothies, I hate the clean up. This however is a cinch and very minimal clean up *happy dance* :)

Shirley x